

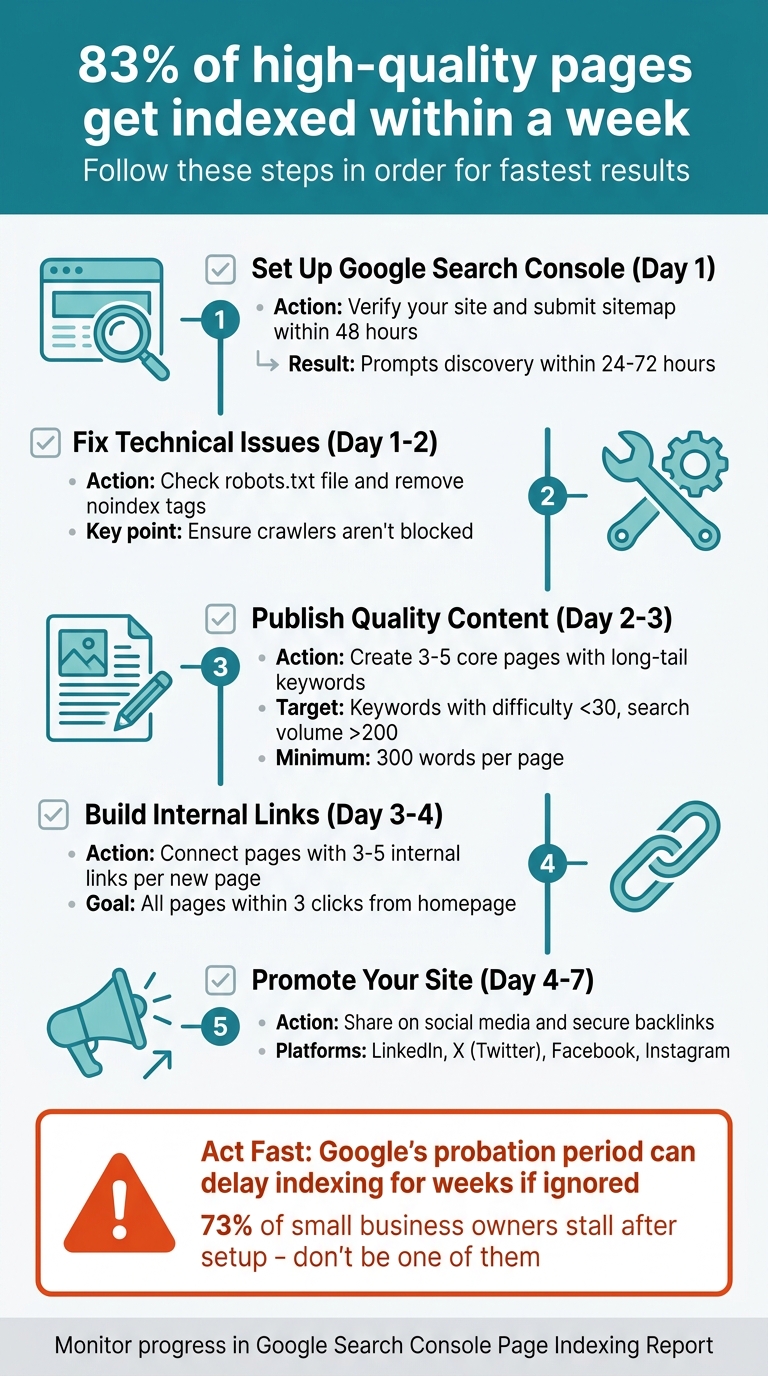
Launching a new website? Getting Google to index your site quickly is your first priority. Without indexing, your site won't appear in search results. Here's the good news: 83% of high-quality pages get indexed within a week if you take the right steps. Here's a quick guide to kickstart your site's visibility:
- Set up Google Search Console: Verify your site and submit your sitemap within 48 hours.
- Fix technical issues: Ensure your robots.txt file and meta tags aren't blocking crawlers.
- Publish quality content: Start with 3–5 core pages targeting low-competition, long-tail keywords.
- Build internal links: Connect pages to help search engines navigate your site.
- Promote your site: Share your content on social media and secure backlinks.
Act fast - Google's "probation period" for new domains can delay indexing for weeks if left unattended. By following these steps, you can speed up the process and start collecting valuable search data sooner.
Force Google to Index Your Pages in 2026 (Page indexing Secrets)
Set Up Google Search Console and Submit Your Sitemap
Google Search Console is your direct line to Google, allowing the search engine to access and understand your website. By setting up a property and submitting a sitemap, you can prompt Google to crawl your site right away. Skipping this step means waiting for Google to find your site on its own, which could take weeks. To get started, you'll need to establish your property and verify ownership.
Create and Verify Your Google Search Console Property
In Search Console, a property represents your website. Adding your site as a property and verifying ownership is essential for accessing data and submitting sitemaps.
When setting up your property, pick the type that suits your needs. Google offers two options: Domain properties (which cover your entire domain) and URL-prefix properties (which focus on specific URLs). For most new websites, Domain properties are a better choice since they consolidate data from across your domain.
To verify ownership of a Domain property, you'll need to use DNS records. This is the only verification method available for Domain properties. Google provides a TXT record that you'll need to add to your DNS settings. If you're using WordPress, the Google Site Kit plugin simplifies this process by handling verification for you. Alternatively, if you already have Google Analytics 4 set up and are using the same Google account, ownership verification can often be completed instantly.
"Ownership verification means proving to Search Console that you own a specific website. A verified owner has the highest degree of permissions in Search Console."
- Google Search Console Help
Don't remove your verification token after setup. Whether it's a DNS record or an HTML tag, keeping it active ensures you retain access to your property. Once verified, data collection begins immediately, though it may take a few days for the data to appear.
Generate and Submit Your XML Sitemap
Once your property is verified, the next step is to help Google navigate your site. An XML sitemap acts as a roadmap, listing all the key URLs on your site to make Google's job easier. If you're using platforms like WordPress, Wix, or Squarespace, sitemaps are usually generated automatically. You can typically find your sitemap at yourdomain.com/sitemap.xml.
To submit your sitemap, go to the "Sitemaps" section in Google Search Console. Enter your sitemap URL - usually just "sitemap.xml" if it's in your site's root directory - and click "Submit". Google will start crawling it immediately.
"A sitemap is a file on your site that tells Google which pages on your site we should know about."
- Google Search Central
Before submitting, test your sitemap for accessibility using the URL Inspection tool. This ensures it isn't blocked by your robots.txt file. After submission, check the Sitemaps report regularly for errors, such as "Couldn't fetch" or "Sitemap has errors", which could prevent proper indexing.
Make sure your sitemap includes only canonical, fully qualified URLs. For example, use "https://www.example.com/page" instead of relative paths. Including only the canonical version of each page helps avoid splitting search results. If your website has over 50,000 URLs, you'll need to create multiple sitemaps and list them in a sitemap index file.
Prepare Your Website for Indexing
Before your site can show up in search results, Google needs to understand your pages. That means building a solid technical foundation to guide search engines on what to crawl and how to interpret your content. Issues like missing meta tags, messy URLs, or accidental blockers can delay - or outright stop - your site from being indexed.
Optimize Meta Tags, Titles, and Descriptions
Your title tag is a key on-page SEO element. Not only does it act as a ranking signal, but it also serves as the clickable headline in search results. Keep it under 60 characters and place your main keyword near the beginning. For instance, instead of a vague title like "Welcome to Our Site", opt for something specific like "Email Marketing Guide for Small Businesses."
Meta descriptions, on the other hand, are your chance to grab attention and boost clicks. Write a concise, engaging summary of 150–160 characters that clearly communicates the page's value.
The meta robots tag offers precise control over how search engines handle your pages. Use directives like noindex to keep private or duplicate pages out of search results and nofollow to manage link equity. Before launching your site, double-check the <head> section of your main pages to ensure these tags are properly configured.
Once your meta tags are in order, it's time to focus on creating clean, user-friendly URLs.
Create Clean, SEO-Friendly URLs
A well-structured URL can build trust and signal relevance even before someone clicks. Use hyphens instead of underscores to separate words, stick to lowercase letters to avoid duplication issues, and naturally include your primary keyword. Keep it simple - aim for 3–5 meaningful words, around 25–30 characters total, while ensuring the full URL (including the domain) stays under 60 characters.
"URLs are one of the first things search engines evaluate when crawling your site. They're also one of the first things users see in search results."
- Gaurav Tiwari, SEO Consultant
Avoid adding dates to URLs for guides or tutorials, as this can make your content look outdated. Stick to static URLs for core pages instead of dynamic parameters like ?id=123. If you're using WordPress, set your permalinks to "Post name" (/%postname%/) and edit auto-generated slugs to keep them concise.
By fine-tuning your URLs, you create clear pathways for search engines to crawl your site. The next step is to ensure those pathways stay open with proper robots.txt configuration.
Configure Robots.txt and Noindex Tags Correctly
A single mistake in your robots.txt file or meta tags can block search engines from accessing your site. Remember, robots.txt dictates which pages search engines can crawl, while noindex tags decide whether pages appear in search results.
Before your site goes live, confirm that your robots.txt file doesn't include a Disallow: / directive, which would block everything. For public content, use this simple directive:
User-agent: *
Allow: /
Keep in mind, blocking AI crawlers like GPTBot or ClaudeBot in your robots.txt file could prevent your site from being cited in AI-generated answers - an increasingly important way to gain visibility.
"A misconfigured robots.txt on a new site can prevent Google from crawling anything."
- Swati Paliwal, Founder, ReSO
Use Google Search Console's URL Inspection tool to verify that your robots.txt file is correctly set up and that no unintended noindex tags are present. Regularly check the "Excluded by noindex tag" report to ensure important pages stay indexed. These steps help search engines focus their crawl budget on your core content instead of wasting resources on irrelevant files.
When combined with earlier Search Console settings, these configurations ensure every crawlable part of your site is ready for indexing.
Publish Quality Content to Attract Crawlers
Once your technical setup is solid, the next step is to showcase your site's expertise through focused, well-crafted content. Search engines like Google won't rank what they can't understand, so quality content plays a critical role in complementing your technical foundation. It signals relevance and authority, helping crawlers identify how your site aligns with user intent.
Develop 3–5 Core Pages with Search Intent in Mind
Begin by creating 3 to 5 cornerstone pages that spotlight your main topics, services, or product categories. These pages act as the backbone of your site, signaling to Google where your expertise lies. Keep them cohesive and purpose-driven.
When planning these pages, prioritize search queries that match your audience's intent. For instance, if you're offering a CRM for freelancers, focus on topics like "How to Track Client Communications" or "Best CRM Features for Solo Consultants." Avoid overly generic or sales-heavy pitches. Educational content - such as guides, how-tos, and explainers - tends to rank more quickly for newer sites compared to transactional or commercial pages. Google often favors informational content from new domains before trusting their commercial intent.
Target long-tail keywords with a difficulty score below 30 and a monthly search volume above 200. For example, "best CRM for freelance consultants" is a manageable target, while "best CRM software" requires a level of authority that new sites typically lack. Structure your content with one H1 tag for the main title, H2s for major sections, and H3s for subsections to make it easier for crawlers to navigate. Aim to answer user queries within the first 100 words to increase your chances of capturing featured snippets.
A compelling example: In 2025, Dr. David McInnis Orthodontics revamped their website by aligning content with search intent and optimizing for local SEO. Within six months, they achieved a 472% boost in organic traffic and a 380% jump in patient inquiries, with over 250 high-intent keywords ranking on Google's first page.
"Win by being the clearest, most trustworthy, most usable answer for the query."
- Aceeoo Editorial Team
Each page should have at least 300 words to provide depth and value. Include author bios, cite reliable sources, and back up claims with data to meet E-E-A-T standards (Experience, Expertise, Authoritativeness, Trustworthiness). Ensure each new page links to at least 2–3 existing pages and is accessible within three clicks from your homepage.
These cornerstone pages will serve as the foundation for integrating targeted keywords effectively.
Use Keywords in Your Content
Strategically place your primary keyword in critical areas, such as the title tag (under 60 characters), URL slug, H1, and meta description (under 155 characters). Incorporate semantic variations in subheadings to create a "semantic halo", enabling a single article to rank for multiple related queries.
To build early relevance, focus on low-competition, long-tail keywords. Target ultra-low-competition keywords with difficulty scores under 15 (Ahrefs) or 40 (Semrush) and search volumes between 90 and 500 per month. Keep in mind that only 5.7% of newly published pages make it to Google's top 10 within a year, with ranking times typically ranging from 2 to 6 months depending on keyword difficulty.
Avoid keyword cannibalization by assigning each target keyword to a single URL. For example, if multiple pages compete for "email marketing tips", Google may struggle to decide which one to rank. Use descriptive anchor text for internal links - replace generic phrases like "click here" with keywords that describe the linked page. Also, optimize your images by including relevant keywords in alt text and using descriptive file names.
"A new domain with zero backlinks has no shot at ranking for 'best CRM software'... quality of content doesn't change that. Start with ultra-low-competition long-tail queries."
- Rohit Sharma, SEO Strategist
Build Internal Links and Share Your Website
Launching your website is just the beginning. To ensure it gets noticed, you need a solid strategy for internal linking and external promotion. Internal links help search engines navigate your site, while social media and backlinks drive early traffic and build credibility.
Create an Internal Linking Structure
Internal links are like signposts for search engines, helping them understand your site's layout and flow. They also pass authority between pages, boosting visibility. Surprisingly, about 40% of websites have 15% or more orphaned pages - pages with no internal links at all.
A great way to structure your internal links is by using the pillar-cluster model. Here's how it works: create a detailed "pillar" page that covers a broad topic, then link it to several "cluster" pages focused on specific subtopics. For example, a pillar page titled "Email Marketing Guide" could link to cluster pages like "How to Write Subject Lines" or "Best Times to Send Emails." Make sure the links go both ways - cluster pages should also link back to the pillar.
Use descriptive anchor text in your body content. This type of contextual linking is 5–10 times more effective at passing authority than links in headers or footers. Place your most critical links in the first 30% of your content, as nearly half of AI engine citations come from this section. Also, ensure every page on your site is reachable within three clicks from the homepage. When you publish new content, add 3–5 internal links to it from existing pages within 24 hours.
"For internal linking, you can use whatever anchor text you want. We use it to better understand the context of the page."
- John Mueller, Search Advocate, Google
Need proof that internal linking works? In 2025, SerpNap, a B2B SaaS company, tested this on a site with 340 pages. They added 47 contextual links to pages ranking in positions 6–20. Within two weeks, 12 pages jumped to the first page of search results, organic traffic to those pages grew by 187%, and the crawl rate tripled.
By building these internal connections, you'll create a strong foundation to amplify your site's reach through social media and backlinks.
Use Social Media and Backlinks for Early Traffic
While internal links help search engines, external efforts like social media and backlinks give your site an extra push. Promoting your content externally not only drives traffic but also builds your domain's reputation.
Social media can generate immediate clicks, unlike search engines, which may take weeks to rank your content. These clicks can lead to branded searches and attract quality backlinks, setting the stage for SEO success.
Start by creating profiles on LinkedIn, X (Twitter), Facebook, and Instagram. Keep your branding consistent - use the same name, logo, and tagline across all platforms. This consistency helps search engines verify your site's authenticity. Don't forget to include a link to your website in your social media bios; it's a simple way for bots to discover your site.
Tailor your content to each platform. On LinkedIn, share value-packed text posts and place links in the first comment to avoid algorithm penalties. On X, create threads with sharp, engaging takeaways. For Instagram and Facebook, focus on Reels, making sure to grab attention within the first three seconds. Engage with comments quickly - especially in the first hour - to encourage active discussions.
"Social signals may not move the SEO needle directly on Google, but they absolutely create the conditions for SEO success."
- Brett Helling, Founder, Trendline SEO
When it comes to backlinks, aim for trusted and authoritative sources. These links signal search engines that your site is credible and worth indexing. Start with simple opportunities: create profiles on GitHub, submit your site to niche directories, and pitch guest posts to relevant industry blogs.
Monitor Progress and Fix Indexing Issues
Once your sitemap is submitted and your content is live, keeping track of your indexing progress is crucial. Google Search Console serves as your go-to tool for this. The Page Indexing Report provides a clear view of how many URLs Google has indexed, with "Indexed" pages shown in green and "Not indexed" pages in gray. For new websites, you should see a gradual increase in indexed pages within the first week. This initial phase helps establish a baseline for assessing your site's indexing performance.
For smaller sites (fewer than 500 pages), a quick way to check indexed pages is by searching site:yourdomain.com on Google. If you notice an important page missing, the URL Inspection Tool can help. It shows the page's index status, the last crawl date, and any issues like robots.txt blocks or "noindex" tags. After running a live test, you can click "Request Indexing" to prioritize the page in Google's crawl queue.
Google usually takes at least a week after sitemap submission to process the content before any technical issues might emerge. The time it takes to index pages can vary from a day to several weeks, depending on your site's authority and technical setup. Keep an eye on the trendline in the Page Indexing Report - unexpected drops in indexed pages or spikes in "Not indexed" counts could indicate technical errors or site-wide blocks.
Use Google Search Console to Track Indexing
After setting up your site's technical foundations, ongoing monitoring ensures your indexing stays on track. The Page Indexing Report not only shows which pages aren't indexed but also explains why. Filtering the report by your submitted sitemap allows you to focus on key URLs rather than autogenerated or less relevant ones.
For persistent problems, the URL Inspection Tool's Live Test is invaluable. It confirms whether fixes have been applied successfully and provides insights like crawlability, fetch status, and canonical URL selection.
Check the Sitemaps Report to verify that Google is still parsing your sitemap correctly. Look for a "Status: Success" message and ensure the "Discovered URLs" count matches your expectations. The Crawl Stats Report is another useful resource, offering details on server availability, response times, and Googlebot activity. Be aware that server response times exceeding 600ms could result in Google deprioritizing your pages in the crawl queue.
Fix Common Indexing Problems
After identifying your indexing status, tackle any issues that might be slowing progress. For new sites, most problems fall into two categories: technical barriers and content quality. In the Page Indexing Report, focus on issues listed under the "Source" column as "Website", which often point to misconfigured robots.txt files or unintended "noindex" tags.
If you see a status like Discovered - currently not indexed, it means Google has found the URL but hasn't crawled it yet. On the other hand, Crawled - currently not indexed indicates that Google crawled the page but decided not to index it. To address this, improve internal linking, ensuring new pages are linked from high-authority pages within 24 hours of publication. Also, enrich your content with unique, high-value information.
For technical issues, review your robots.txt file to ensure there are no unintended "Disallow" directives blocking Googlebot from accessing important sections. Remove any "noindex" meta tags or HTTP headers (like X-Robots-Tag) unless you specifically want to exclude a page from indexing. Clean up your sitemap by removing URLs that return 404 errors, redirect to other pages, or contain noindex tags. Only include canonical URLs in your sitemap.
Once you've fixed an issue, use the "Validate Fix" button in the issue details to notify Google and monitor the recrawl process. This validation can take up to two weeks. Avoid overusing the "Request Indexing" feature, as Google imposes limits on how often you can use it. For brand-new domains, prioritize getting your homepage indexed first using the URL Inspection Tool, as it can help Google discover the rest of your site through internal links.
Conclusion
Taking the technical steps outlined here - from setting up Google Search Console to organizing strategic internal links - can make all the difference in getting your new domain noticed during its critical first week. The key lies in following these steps in order. Start by verifying your Google Search Console account on day one, submit your XML sitemap within the first 48 hours, and use the URL Inspection tool to get your website indexed by Google fast by requesting indexing for your homepage and priority pages. These actions can prompt discovery within 24–72 hours, rather than leaving your site to rely on slower passive crawling methods.
Acting quickly is essential. For example, 73% of small business owners stall after setting up Google Search Console because they don't know what to do next. Avoid this by addressing common technical oversights, like removing "noindex" tags left behind from staging environments and auditing your robots.txt file. Also, ensure your internal linking structure keeps all key pages within three clicks of your homepage. Completing these tasks within the first 48 hours can give you access to performance data 11 days earlier than those who delay.
While the first week is crucial for laying a strong foundation, it's just the start of your SEO journey. With 96.55% of all web pages receiving no traffic from Google, your early efforts will help determine whether your site joins the small percentage that succeeds. Keep a close eye on your Page Indexing Report, resolve any issues promptly, and focus on creating high-quality content that aligns with what users are searching for.
The actions you take in these initial days set the tone for your site's visibility, giving you a competitive edge over those who hesitate to prioritize search optimization.
FAQs
How do I know if Google has indexed my new site yet?
To see if Google has indexed your site, simply type site:yourdomain.com into the Google search bar. If your pages show up in the results, it means they've been indexed.
Another option is to use the URL Inspection tool in Google Search Console. This tool lets you check the status of a specific page and even request indexing if necessary. Keeping an eye on these tools ensures you know when your site is properly indexed.
What should I do if my homepage is crawled but not indexed?
If your homepage is being crawled but isn't indexed, start by using the URL Inspection tool in Google Search Console to request indexing. Make sure your sitemap is properly submitted and reflects the latest updates. Check for any crawl errors or coverage issues that might be preventing indexing. Additionally, strengthen your internal linking structure to guide Google to your homepage more effectively. These actions can encourage Google to prioritize indexing your page.
How many backlinks do I need in the first week?
There's no magic number of backlinks you need in your first week. Instead, aim to secure 10 high-quality backlinks over your first 1-3 months. This approach helps build your site's authority and sets a solid foundation for long-term SEO success. Always focus on quality rather than quantity to ensure steady and reliable growth.