
Want your website to show up on search engines faster? Submitting your URLs directly to platforms like Google and Bing can speed up the process. Here's a quick breakdown of how to do it:
- Why Submit URLs? It ensures search engines know about your new or updated pages without waiting for them to discover them naturally, which is essential if your website is not indexed.
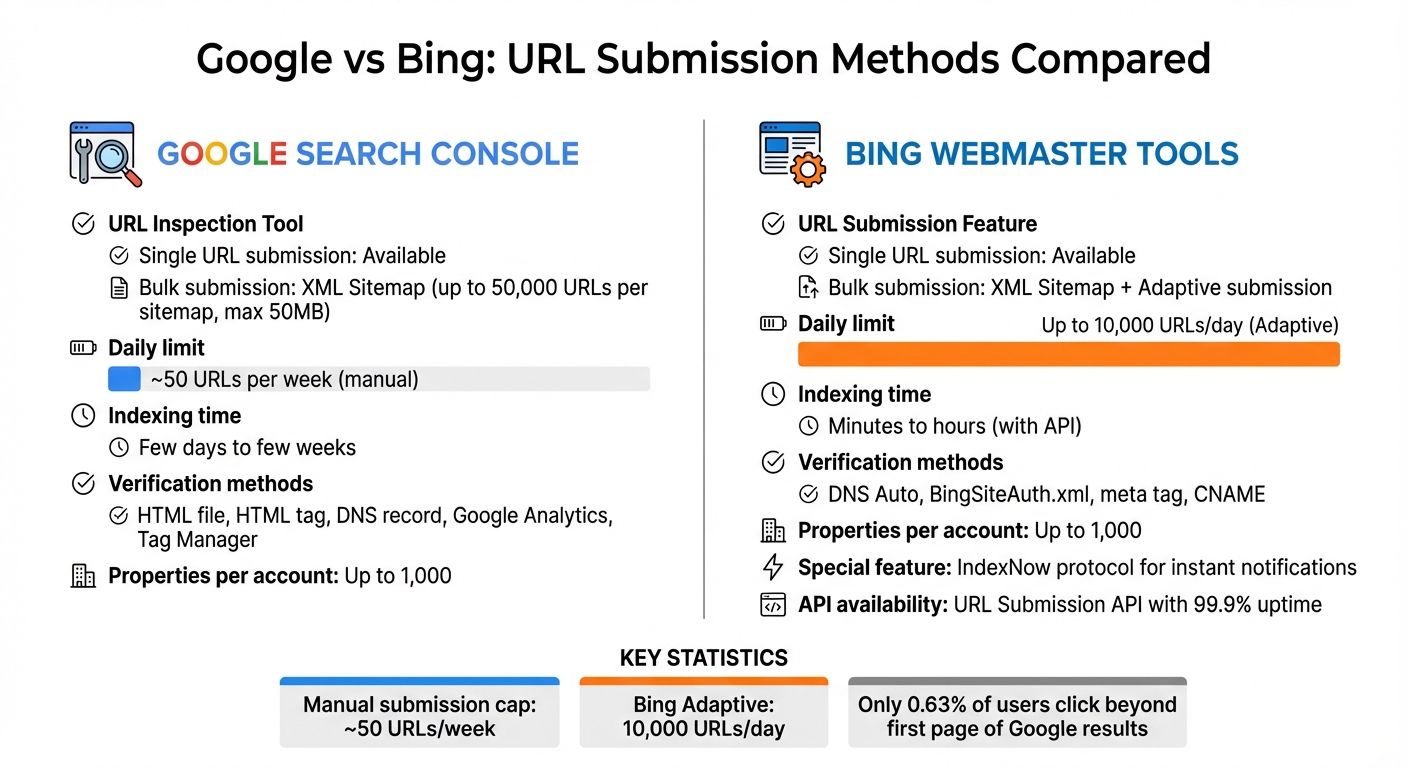
- How to Submit to Google: Use Google Search Console's URL Inspection Tool for single pages or upload an XML sitemap to get your website indexed by Google fast.
- How to Submit to Bing: Use Bing Webmaster Tools' URL Submission feature or submit sitemaps for bulk indexing.
- Automation Tools: For frequent updates, tools like IndexMachine automate submissions to Google and Bing, saving time.
Setting Up Google Search Console
Creating Your Account and Verifying Ownership
To get started with Google Search Console, you'll need a free Google account. Once you're signed in, add your website by clicking the property selector dropdown and choosing "+ Add property."
When adding your site, you'll have two options for property types:
- Domain property: Tracks your entire domain, including all subdomains (like
m.example.comorwww.example.com) and both HTTP and HTTPS protocols. This option requires DNS verification. - URL-prefix property: Monitors only the specific path and protocol you enter. It offers more flexibility for beginners since it allows verification without modifying DNS settings.
Google provides several ways to verify your ownership:
- HTML file upload: Download a unique file and place it in your website's root directory.
- HTML tag: Add a
<meta>tag to the<head>section of your homepage. - DNS record: Add a TXT or CNAME record through your domain registrar (e.g., GoDaddy or Namecheap).
- Google Analytics or Tag Manager: If you're already using these tools, you can verify your site instantly using the existing tracking code.
Once you've added the verification code, use your browser's search function (Control + F) to find "google-site-verification" in your page source. This ensures the code is placed correctly before you hit "Verify." To avoid losing access in the future - such as during a site update - it's a good idea to set up multiple verification methods in your property settings.
One Google account can manage up to 1,000 properties, and data collection starts immediately after adding a property, even if verification isn't complete yet. Once you're verified, you'll be ready to dive into the dashboard and start using its tools.
Navigating the Dashboard
After verifying your site, the dashboard becomes your control center for managing URL submissions and ensuring smooth indexing. Following an SEO indexing checklist can help you stay organized during this process. One of the most important tools here is the URL Inspection tool, which you'll find at the top of the page and in the left sidebar. This tool allows you to check details for individual pages and request manual indexing when needed.
Another key feature is the Sitemaps tab, located under the "Indexing" section. Here, you can submit your XML sitemap, which helps Google crawl and index your site more effectively. The Pages report provides insights into which pages have been successfully indexed and flags any issues, like 404 errors or pages blocked by your robots.txt file.
Data typically starts populating within a few days after verification. Before submitting any URLs, double-check your robots.txt file to make sure it isn't accidentally blocking Googlebot from accessing important pages. Additionally, the dashboard includes tools like the Manual Actions report, which alerts you to spam policy violations, and the Security Issues report, which notifies you if your site has been compromised.
With these tools at your fingertips, you'll have everything you need to monitor and optimize your site's performance in Google Search Console.
How to Submit URLs and Sitemaps to Google
Using the URL Inspection Tool
To use the URL Inspection tool, enter the full URL (including https://) in the search bar or click the "Inspect" icon.
Once you do, Google will show the current indexing status of the page. To check if the page is ready for indexing, click "Test Live URL". If everything checks out, proceed by selecting "Request Indexing". For confirmation, expand the "Page indexing" section to ensure both "Crawl allowed?" and "Indexing allowed?" display "Yes." This means the page isn't blocked by robots.txt or noindex tags.
After requesting indexing, it might take Google anywhere from a few days to a few weeks to crawl the page. Keep in mind, there's a daily limit on how many URL inspection requests you can make per property. Also, repeatedly requesting a recrawl for the same URL won't speed up the process. This tool is most effective for single pages that have been recently updated and need Google's attention quickly. For multiple URLs, it's better to switch to the Sitemaps feature.
Submitting Your Sitemap
If you need to index multiple URLs at once, the Sitemaps feature is the way to go. Head over to the "Sitemaps" report in the left-hand menu, type in your sitemap's relative URL (e.g., sitemap.xml) into the "Add a new sitemap" field, and hit "Submit".
Before submitting, ensure your sitemap file is hosted on your site - preferably in the root directory - and is accessible to Googlebot without requiring login credentials. Use the URL Inspection tool's "Live Test" on your sitemap URL to confirm that "Page fetch" is marked as "Successful". A single sitemap can include up to 50,000 URLs and must stay under 50MB when uncompressed. If your site exceeds this limit, divide it into smaller sitemaps and link them in a sitemap index file.
Once submitted, check the Sitemaps report. If it says "Success", Google fetched your sitemap correctly. If it displays "Has errors", there are issues to address. Only resubmit your sitemap if you've made major changes - Google automatically recrawls existing sitemaps on its own schedule.
Setting Up Bing Webmaster Tools
Creating Your Account and Verifying Ownership
Bing Webmaster Tools, a free service from Microsoft, is easy to set up. You can sign up using your Microsoft, Google, or Facebook account.
Once logged in, you have two options to add your site. You can either import it directly from Google Search Console - this will automatically verify your site and import your sitemaps. Alternatively, you can manually enter your website's URL.
To verify ownership, Bing offers several methods:
- Use DNS Auto Verification through the Domain Connect standard.
- Upload the BingSiteAuth.xml file to your site.
- Add the provided
<meta>tag to the<head>section of your homepage. - Insert a CNAME record in your domain's DNS settings.
Once verified, Bing will begin aggregating and displaying search data within 48 hours. To check if your site is indexed, simply perform a site:yourdomain.com search on Bing. You can manage up to 1,000 sites per account, and if you choose to import from Google Search Console, you can bring in up to 100 websites at a time.
After completing the setup, head over to the dashboard to start monitoring your site's performance.
Navigating the Dashboard
The dashboard is designed for ease of use, with a left-hand menu that lets you switch between different properties using a site selection dropdown.
Some of the key tools include:
- Search Performance: Track clicks, impressions, and other key metrics.
- URL Inspection: Analyze individual pages to check their indexing status.
- Site Explorer: View your site's structure and pages.
- Sitemaps: Submit and monitor your XML sitemap files.
- IndexNow: Notify Bing of content updates for faster crawling.
Submitting URLs is straightforward - select your site from the dropdown menu and click "URL submission" in the left-hand panel. You can also enable email notifications in the Settings tab to stay updated on crawl errors or indexing issues.
The dashboard integrates seamlessly with Microsoft Clarity, a free tool that provides insights into user behavior and heatmaps. A guided setup process makes it easy to connect Clarity to your account. Additionally, the User Management feature allows you to add team members and assign specific permissions.
How to Submit URLs and Sitemaps to Bing
Using the Submit URLs Feature
Bing Webmaster Tools offers a handy URL Submission feature, similar to Google Search Console, to help speed up the indexing process. This tool allows you to manually request Bing to crawl either individual pages or multiple URLs in batches. To get started, select your verified site, then click on "URL submission" in the left-hand menu. You can either input a single URL or paste several, with each URL on a separate line, for batch submission.
One standout feature is Bing's Adaptive submission, which lets you submit up to 10,000 URLs daily without any monthly limits. This is especially helpful when you're rolling out new content or making updates that need quick attention. Chris Love, Founder of love2dev.com, shared his experience with this feature:
"I checked 10 minutes later and there I was #2 for 'jquery obsolete' on Bing.com..."
Before submitting, you can use the URL Inspection Tool to check for potential crawl issues or HTTP response code errors.
Once you've submitted your URLs, the next step is to ensure Bing can efficiently index your entire site by submitting your sitemap.
Adding Your Sitemap
Submitting a sitemap is a simple way to help Bing understand your site's structure. To do this, go to the Sitemaps section in the left-hand menu and click the Submit sitemaps button in the top-right corner. Enter the full URL of your sitemap (e.g., https://example.com/sitemap.xml) and hit Submit.
Bing supports several formats, including XML, RSS 2.0, Atom 0.3 and 1.0, and plain text files. The platform processes sitemaps at least once every 24 hours to check for updates. You can also include your sitemap in your robots.txt file using the following directive:
Sitemap: http://www.example.com/sitemap.xml.
To monitor your sitemap's performance, check the Sitemaps table in your dashboard. This table displays key details like the "Last Processing Date" and "Processing Status", making it easier to spot and resolve errors. If you're using WordPress plugins that generate sitemap indexes, consider submitting individual "child" sitemaps (like sitemap_post.xml) separately. This ensures Bing treats them as direct URL lists for indexing.
For a more automated solution, you can turn to Bing's URL Submission API.
Using Bing's URL Submission API
The URL Submission API takes things a step further by automating the submission process. This tool allows for real-time notifications, so Bing can index new or updated content almost instantly. Instead of waiting for traditional crawls, the API enables "push" indexing, offering a faster and more efficient alternative. It even boasts a 99.9% service-level availability.
Many major platforms have seen impressive results with this approach. For example, LinkedIn uses the API to notify Bing about updates to profiles and job postings. David Schacter, Sr. Staff Engineer at LinkedIn, highlighted the benefits:
"This cuts the search index update time at Bing from weeks to minutes. As a result, we see a significant increase in traffic to LinkedIn from Bing."
eBay also relies on the API to manage its massive inventory of 1.5 billion listings. Chris Reynolds, Head of Technical SEO at eBay, shared:
"eBay uses the Bing URL submission API to notify Bing whenever important new pages are created or updated... helping Bing search users find the most relevant eBay products."
If you're a WordPress user, you can simplify this process by installing the official Bing Webmaster Tools plugin. This plugin automates URL submissions using an API key. Additionally, the API integrates seamlessly with the IndexNow protocol, a standard that enables instant notifications of content changes - whether you're adding, updating, or removing content - without relying on traditional crawlers.
Automating URL Submissions with IndexMachine

Setting Up IndexMachine
IndexMachine makes URL submissions easy by directly connecting to Google Search Console and Bing Webmaster Tools via their official APIs. This integration eliminates the need for manual submissions, saving you time and effort. Once you sign up, you link your verified properties from both search engines to the IndexMachine dashboard. This secure connection lets the platform access your site data and handle submissions automatically.
The setup process is quick and efficient. Once your accounts are connected, IndexMachine monitors your site for new or updated content. This replaces the tedious manual submission process, which is often limited to about 50 URLs per week. With IndexMachine, URL submissions happen seamlessly in the background, sparing you from logging in and manually pasting URLs.
Main Features of IndexMachine
IndexMachine uses the Google Indexing API and Bing URL Submission API to notify search engines as soon as your content goes live. This drastically reduces the time it takes for your pages to get indexed - from days or weeks to just minutes.
The platform also provides tools to help you monitor progress. Visual charts display indexing trends, while detailed insights on coverage and last crawl dates help you spot potential issues. You'll also receive alerts for 404 errors and daily indexing reports, keeping you informed about your site's performance.
Another standout feature is the ability to customize how each search engine handles your URLs. For Bing, IndexMachine supports an Adaptive URL submission feature, allowing up to 10,000 URLs to be submitted daily. You can even toggle indexing on or off for each search engine by domain, giving you full control over where your content gets submitted.
IndexMachine Pricing Plans
IndexMachine offers three lifetime pricing tiers to suit different needs:
| Plan | Price | Domains | Pages per Domain | Daily Limits |
|---|---|---|---|---|
| SaaS Builder | $12.50 | 1 | 1,000 | 20 URLs/day (Google), 200 URLs/day (Bing) |
| 5 Projects | $50 | 5 | 1,000 | 20 URLs/day (Google), 200 URLs/day (Bing) |
| Solopreneur | $84.50 | 10 | 10,000 | 20 URLs/day (Google), 200 URLs/day (Bing) |
All plans include essential features like full autopilot mode, daily reports, 404 error alerts, and indexing for both Google and Bing. The daily submission limits align with Google's API restrictions, while Bing's higher capacity allows for more flexibility. For those needing to index more pages quickly, instant boost options are available to temporarily increase your daily limits.
How to Submit Your Website to Search Engines Like Google, Bing and Yahoo
Fixing Common Indexing Problems
After submitting your URLs and sitemaps, the next step is figuring out and resolving common indexing issues.
Checking Coverage Status and Crawl Dates
Both Google Search Console and Bing Webmaster Tools offer detailed reports to help you identify indexing problems. In Google Search Console, head to the "Page indexing" report. This tool highlights issues like 404 errors, robots.txt blocks, or noindex tags, organizing them by type so you can spot patterns affecting your site.
The URL Inspection Tool is another handy feature. It shows a page's fetch status and can flag technical problems. Pay attention to the "Last crawl" date - if it's outdated, your page may not reflect recent updates. The tool also confirms whether crawling is allowed (via robots.txt) or if indexing is blocked by a noindex tag.
Bing Webmaster Tools offers similar functionality with its URL Inspection feature. It provides clear feedback on whether a URL is blocked, facing server issues, or simply hasn't been crawled yet. If you see "Discovered - currently not indexed", it means Bing knows about the page but hasn't prioritized it for indexing.
To check if a specific page is indexed, use the site: operator in either Google or Bing. For example, type site:yourdomain.com/page-url into the search bar. If no results show up, the page isn't indexed.
Once you've pinpointed the issues, you can start fixing common errors like 404s.
Fixing 404 Errors and Resubmitting Pages
A 404 error means the page is missing or has been moved without a proper redirect. If you've intentionally removed the page and don't plan to replace it, leaving the 404 status is fine. But if the removal was accidental or the content has a new location, you'll need to take action.
Start by restoring the page if it was deleted by mistake. If the content has moved, set up a 301 redirect to guide users (and search engines) to the new URL. Don't forget to update any internal links that still point to the old URL. Once these changes are in place, use the URL Inspection Tool in Google Search Console. Enter the updated URL and click "Request Indexing" to encourage Google to recrawl it.
For pages blocked by robots.txt, use the Robots Testing Tool in Google Search Console to pinpoint the issue. If the block wasn't intentional, update your robots.txt file to allow Googlebot access. Similarly, remove any noindex tags or X-Robots-Tag directives from pages you want included in the index.
After making these fixes, click "Validate Fix" to trigger a recrawl. Keep in mind that validation can take a few days. For larger updates, resubmitting your XML sitemap ensures search engines quickly discover all changes. Track progress through the Index Status report instead of repeatedly requesting recrawls.
Conclusion
Getting your URLs indexed doesn't have to be complicated. It boils down to setting up the right tools, submitting your content, and keeping a close eye on performance. Tools like Google Search Console and Bing Webmaster Tools are invaluable - they're free and provide detailed insights into how search engines interact with your site. Make the most of these resources to submit and track your content effectively.
For smaller websites, manual submission works fine, but it does come with limitations - like being capped at around 50 URLs per week and potentially waiting days or even weeks for indexing. If you're managing multiple domains or frequently publishing new content, these delays can become a bottleneck. That's where automated indexing tools come in.
Automating the process can save you time and effort. Tools like IndexMachine simplify the workflow by integrating directly with Google Search Console and Bing Webmaster Tools. They handle URL submissions, monitor indexing status, and provide automated updates, daily reports, and error alerts - all while staying within official API limits. This eliminates the need for constant manual checks and ensures you stay on top of your indexing game. If you have been comparing options, it is worth looking at INDEXED.pro's credit pricing and how IndexMeNow compares before you commit to a per-URL model.
Whether you stick with manual submissions or opt for automation, one thing remains critical: consistent monitoring and timely updates. Regularly review your coverage reports, fix errors as they appear, and keep your sitemaps current. With only 0.63% of users clicking beyond the first page of Google results, quick and accurate indexing is key to staying visible in search rankings. A well-maintained indexing strategy ensures your content remains accessible and competitive.
Stay proactive, monitor your indexing efforts, and use the tools at your disposal to maintain your visibility in search results.
FAQs
What are the advantages of using automation tools for submitting URLs to search engines?
Using automation tools to handle URL submissions can make the indexing process much quicker and smoother. Instead of manually submitting each URL one by one, these tools let you notify search engines about multiple pages simultaneously - sometimes managing hundreds or even thousands of URLs at once. By leveraging features like XML sitemaps or API-based bulk submissions, you save time and ensure your new or updated pages are indexed without delay.
These tools also help reduce errors and maintain consistency. They ensure every URL is properly formatted, includes the correct canonical tags, and is submitted to the appropriate property. Plus, many automation tools offer real-time feedback, such as alerts for crawl errors or updates on index status. This means you can keep an eye on your site's performance and tackle any issues as they arise.
With the submission process streamlined, SEO teams can shift their focus to more impactful tasks like crafting high-quality content and strengthening backlink strategies. This not only enhances your site's visibility but can also help drive more organic traffic.
How can the URL Inspection Tool help fix indexing problems?
The URL Inspection Tool in Google Search Console is a handy feature that shows how Google interprets and interacts with a specific page. By entering the complete URL, you can check if the page has been crawled and indexed. It also flags potential issues, such as crawlability errors, mobile usability concerns, or missing structured data, which might block the page from appearing in search results.
You can also use the tool to run a live test against Google's indexing standards. This helps uncover problems like blocked resources, no-index tags, or rendering issues. After addressing these problems, you can re-test the page and ask Google to recrawl it, helping to speed up the indexing process.
In short, the URL Inspection Tool is a must-have for diagnosing and resolving issues to ensure your pages are indexed properly and without delays.
Why should I update and monitor my sitemap regularly?
Keeping your sitemap current and checking it regularly is key to making sure search engines stay informed about updates to your site. Whether you're adding, removing, or tweaking pages, an updated sitemap helps search engines focus on indexing your most recent content, boosting your visibility in search results.
Using tools like Google Search Console to monitor your sitemap can help you spot problems like parsing errors or outdated URLs. Regularly reviewing your sitemap ensures accurate indexing, minimizes crawl errors, and keeps your content easy to find for both users and search engines.